Cape Coral Pool Plumbing Layout Before Shotcrete
Explore Our Services
Contact Us Today!
(239) 322-9295
Shotcrete day can make a backyard look transformed in hours, but the work that gets buried first deserves your closest attention. A correct pool plumbing layout protects circulation, water features, equipment access, and future serviceability long after the concrete shell cures.
Before the crew applies the shell, every pipe route and wall fitting should match the approved plans. The plumbing must be finalized, secured, capped, pressure-tested, and inspected before shotcrete covers it. Here is what Cape Coral homeowners should review before that point.
What Must Be Settled Before the Shell
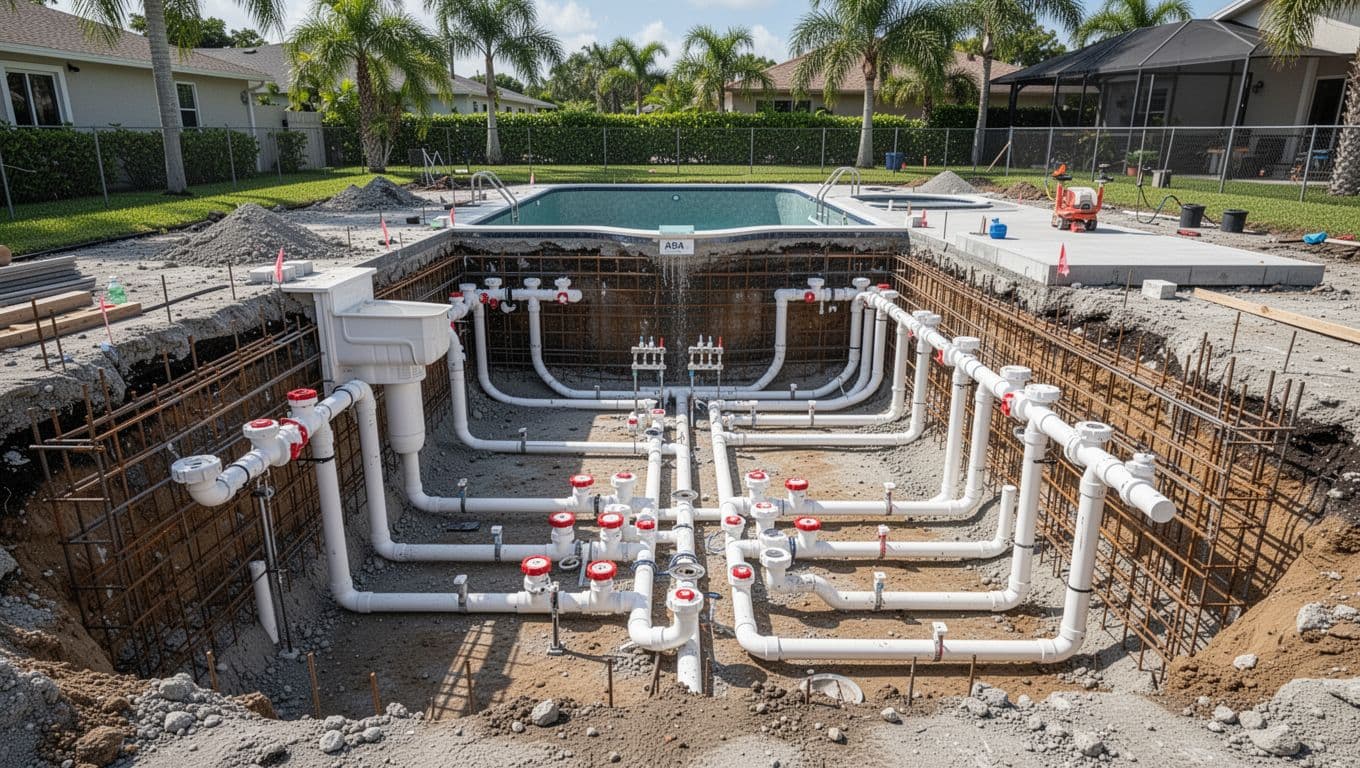
Pool plumbing rough-in happens after excavation and steel installation but before the shell material is sprayed. At this stage, the crew connects the pool's suction lines, return lines, light conduits, spa plumbing, and equipment pad piping.
The exact arrangement depends on the pool design. A simple rectangular pool has fewer lines than a pool with an attached spa, heater, salt system, water features, sun shelf, or in-floor cleaning system.
Gunite and shotcrete use different placement methods
Homeowners often use "gunite" and "shotcrete" interchangeably. In pool construction, gunite usually refers to a dry-mix material that receives water at the nozzle. Shotcrete usually refers to wet-mix concrete delivered to the jobsite already mixed with water.
Both methods create a pneumatically placed concrete shell. The difference is how the material reaches the nozzle, not whether the pool needs a carefully planned plumbing system. In either case, the pipe locations, fittings, supports, and test points must be ready before the shell material goes in.
The plumbing disappears quickly
Once shotcrete covers the excavation, a misplaced pipe becomes difficult and expensive to correct. A return fitting at the wrong elevation can affect circulation. An inaccessible valve can make future maintenance harder. A damaged underground line may not show a problem until the pool is filled and the equipment starts running.
That timing gives homeowners a clear inspection point. Ask to review the plumbing before the crew begins spraying, while the pipes and fittings are still visible.
How to Read a Pool Plumbing Layout Before Shotcrete
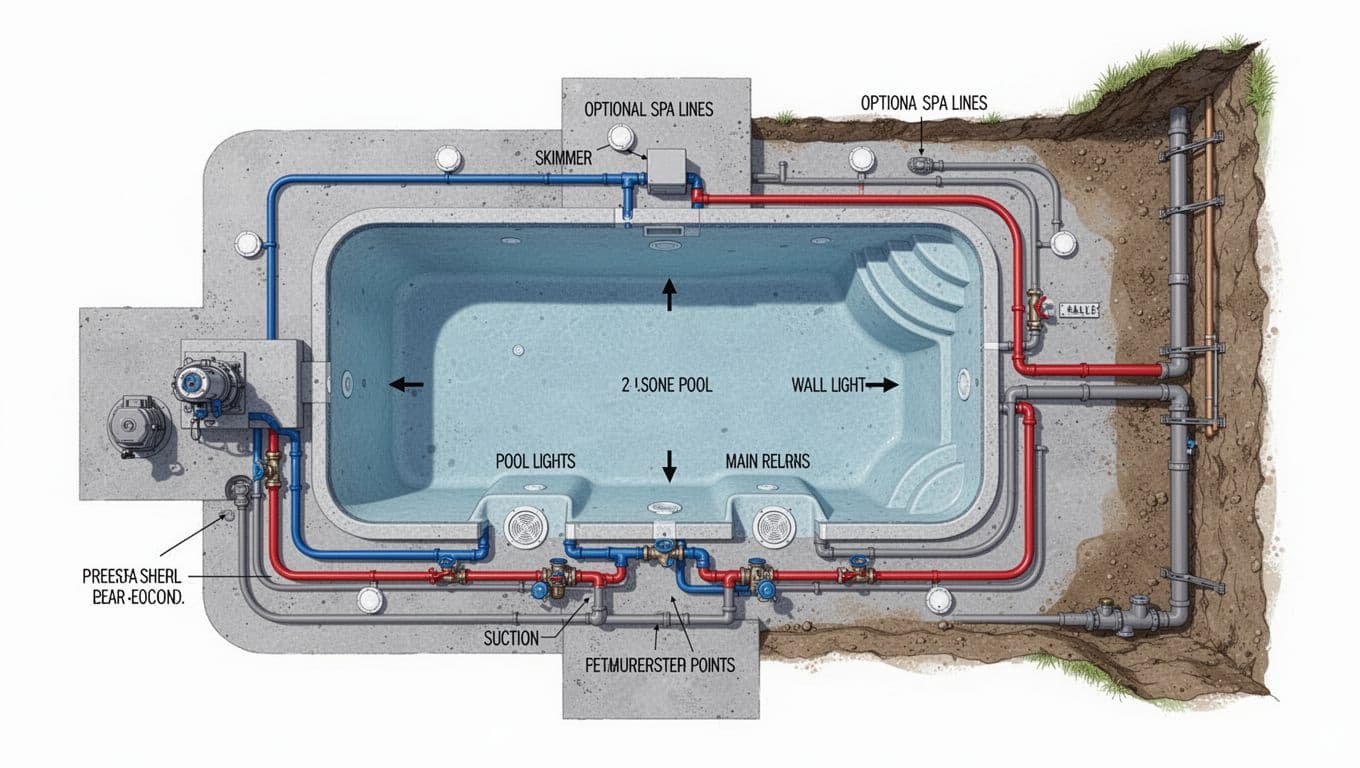
You don't need to read every technical notation on a plan set. However, you should be able to identify where water enters the system, where it returns to the pool, and how each feature connects to the equipment pad.
A good plan also shows the relationship between the pool shell, equipment location, deck, screen enclosure, house, and property boundaries.
Suction lines connect the pool to the pump
The suction side carries water from the pool to the pump. It usually includes the skimmer and main drains.
The skimmer pulls water from the surface, where leaves, sunscreen, and other debris collect. Main drains sit at the pool floor and help draw water from deeper areas. Their locations should match the approved plan and the pool's shape.
Each suction line should have a clear route to the equipment pad. The layout should also show valves that allow the builder or service technician to isolate different suction sources when needed.
Main drain plumbing requires careful coordination with the steel, bonding, and shell elevations. Florida inspection guidance places an early pool inspection after excavation, reinforcing steel, bonding, and main drain installation, but before concrete placement. Your pool professional should confirm the inspection sequence for your permit.
Return lines send treated water back
After water passes through the pump, filter, heater, chlorination equipment, or other treatment equipment, return plumbing carries it back to the pool.
Return fittings are placed in the pool walls or floor. Their location affects circulation, surface movement, heating, and the removal of treated water throughout the pool. An attached spa usually has separate suction and return lines so the system can operate in pool mode, spa mode, or a shared configuration.
Other lines may serve:
- A dedicated cleaner connection
- Spillover or raised-spa plumbing
- Deck jets and bubblers
- Waterfalls or other water features
- A solar heating loop
- A dedicated heater bypass or circulation route
Every extra feature adds pipe, valves, equipment connections, and possible service points. The plumbing plan should identify those routes before anyone covers them.
Lights and equipment pad plumbing need coordination
Pool lights are not water-circulation pipes, but their niches or nicheless fixtures and conduits still need to be installed before shotcrete. Their locations should match the lighting plan and remain coordinated with steel, fittings, benches, steps, and other shell features.
At the equipment pad, the plumbing should leave enough room for the pump, filter, heater, salt system or chlorinator, automation controls, and service access. Valves should remain reachable after the pad, deck, screen enclosure, and landscaping are complete.
A clean layout usually has identifiable lines and an organized route to the pad. It shouldn't force future technicians to guess which pipe serves a spa, feature, cleaner, or return manifold.
Cape Coral Conditions That Affect the Plan
Cape Coral pool projects involve more than digging a hole and spraying concrete. Property lines, easements, drainage, screen enclosures, utilities, and access for construction equipment can all affect the pool's final location.
The approved plans control the project. If the design changes in the field, the builder should resolve that change before plumbing gets buried.
Permit and inspection timing matters
Cape Coral added a Structural Pool Final Inspection for all Pool/Spa permits effective March 1, 2026. That final occurs after the Pool/Electrical Final is approved and checks the completed pool, surrounding structural work, safety barriers, walking surfaces, drainage slopes, site safety, and required trade finals.
That inspection happens later, but it shows why the pool must follow the approved plans throughout construction. An early plumbing or structural change can create problems during later inspections if the completed work no longer matches the permitted design.
Pool work may also involve separate trade permits and inspection steps. Confirm the current requirements with the City of Cape Coral Development Services, your pool contractor, and the professionals listed on the permit.
Lot layout and drainage can affect equipment routes
Many Cape Coral lots have limited side-yard space, seawalls, easements, screen enclosures, or drainage considerations. The equipment pad may need to sit farther from the pool than expected, which can lengthen suction and return runs.
A longer route isn't automatically a defect, but the contractor should account for it in the design and equipment selection. Pipe paths should avoid unnecessary conflicts with footers, buried utilities, irrigation, electrical conduits, and future deck work.
Review the Cape Coral pool setback requirements before excavation. Moving the pool or equipment pad later can affect plumbing, electrical work, screen enclosure dimensions, and total cost.
Warning Signs of a Poor Pool Plumbing Layout
You can spot several concerns during a pre-shotcrete walkthrough. These signs don't prove that a system is defective, but they deserve a direct answer from the builder before the shell covers the work.
Pipes are loose, damaged, or poorly supported
PVC plumbing should stay in the planned position while the crew prepares for shotcrete. Loose pipes can shift when workers walk through the excavation or when concrete is placed. Pipes rubbing against steel, sharp surfaces, or unstable soil may also need attention.
Look for unsupported sections, crushed pipe, cracked fittings, sharp bends that don't match the plan, and lines that cross through areas reserved for steps, benches, drains, or other shell features.
The crew should protect the plumbing from movement and damage. Support methods vary by installation, so the pool professional should explain how the lines will remain in position during shotcrete.
Fittings don't match the drawings
Compare the visible skimmer, drains, returns, light locations, spa fittings, and water-feature lines with the approved plan. Check elevations as well as horizontal locations.
A return that looks close to the correct spot may still be wrong if it conflicts with a bench or sits at an unsuitable height. The same applies to skimmers, cleaner ports, spillways, and light fixtures.
A pipe route that looks acceptable from above can still have the wrong elevation, fitting, or connection behind the shell.
Open ends aren't capped or testing isn't documented
Open pipes should be capped or otherwise prepared for testing and shotcrete. Uncapped lines can collect dirt, stones, water, or construction debris.
The contractor should also complete the required pressure test and document the result according to the approved plans, applicable Florida requirements, and the inspector's direction. Homeowners shouldn't adjust test equipment, open valves, or attempt repairs themselves.
Ask who will perform the inspection, when the pressure test will occur, and how the builder will handle a failed test. A clear answer is part of a professional construction process.
Pre-Shotcrete Walkthrough Checklist
Schedule the walkthrough before shotcrete, not while the crew is preparing to spray. Keep the approved plan set available, and ask the builder to identify each visible line.
- Compare the pool shell shape, steps, benches, sun shelf, spa, skimmer, drains, returns, lights, and water features with the approved plans.
- Confirm that the suction lines run from the skimmer and main drains toward the correct equipment connections.
- Trace the return plumbing from the equipment pad to each return, spa fitting, cleaner connection, and water feature.
- Ask the contractor to identify pipes that are not visible at the pool wall, especially lines serving the spa, heater, solar system, or specialty features.
- Check that fittings and pipes are secured, protected from damage, and positioned correctly around reinforcing steel and shell features.
- Confirm that open pipe ends are capped and that test points, valves, and temporary fittings are accessible.
- Ask whether the required pressure test has passed and request the project record or inspection documentation.
- Confirm that the required pre-shotcrete inspection has been scheduled or approved before concrete placement.
- Photograph the plumbing from several angles, including the equipment pad and each pool wall. Keep those photos with your plans, contract, and change orders.
- Get any correction or design change in writing before shotcrete begins.
The builder, pool designer, plumber, electrician, and inspector may each have separate responsibilities. A homeowner's walkthrough doesn't replace their work, but it can catch confusion while the installation remains visible.
Conclusion
A reliable Cape Coral pool begins with a plumbing plan that fits the approved shell, equipment pad, property, and inspection sequence. The most important checkpoint comes before shotcrete, when you can still see whether pipes are routed correctly, fittings match the drawings, and every line is ready for testing.
Gunite and shotcrete differ in material placement, but both require the same careful preparation around plumbing. Before the crew covers the work, confirm that the pool plumbing layout is finalized, supported, capped, pressure-tested, and inspected by the responsible professionals.