White Salt Deposits on New Block Walls in Fort Myers
Explore Our Services
Contact Us Today!
(239) 322-9295
White deposits on a new concrete block wall may be efflorescence , a mineral residue left when moisture moves through masonry and evaporates at the surface. The deposit alone doesn't identify where the moisture came from or establish that there's a defect.
For Fort Myers homeowners, the useful next step is to look at the wall and its surroundings together. The location of the residue, the way the site handles water, and nearby construction details can help a contractor assess what's happening.
How Efflorescence Forms on Block Walls
Efflorescence on block walls develops when water dissolves soluble salts in masonry or related materials. As moisture moves toward the exposed surface and evaporates, it can leave those salts behind as a white or light-colored deposit.
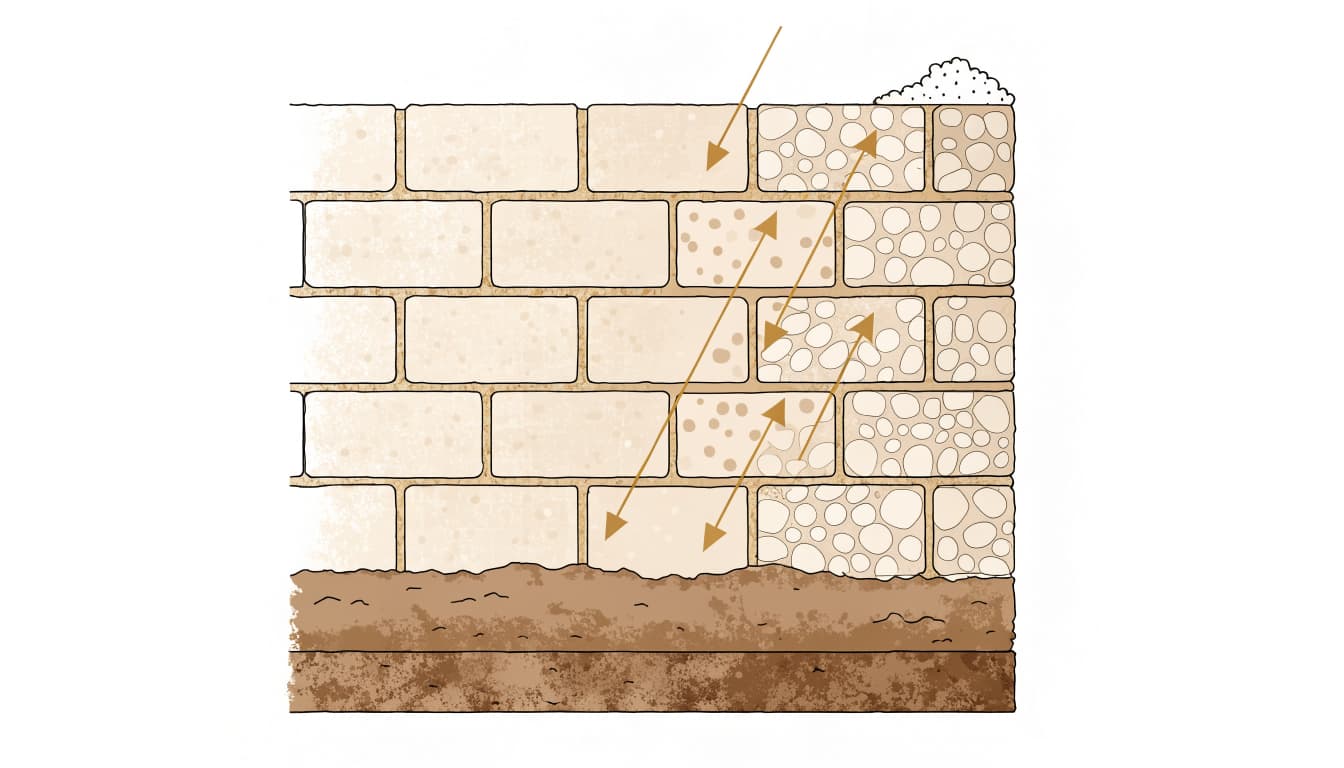
Concrete block and mortar are porous, so moisture can move through them. The appearance of a deposit depends on the materials and moisture conditions at that part of the wall. A patch near the base, for example, doesn't establish on its own whether water entered at the base or somewhere else.
The white material also doesn't tell you which salts are present. Coastal exposure raises separate questions about salt and building materials. Our guide to protecting masonry from salt and moisture covers those broader coastal concerns.
For a new home, the practical goal is to understand the moisture conditions around the wall rather than assign a cause based on appearance alone.
What White Deposits Can Look Like
A white film on masonry can resemble a light dusting, a powdery patch, or a crystalline residue. It may follow mortar joints or appear across the face of individual blocks. The appearance can vary with the surface and the amount of residue present.
Look at the pattern
Stand back and note whether the mark is concentrated in one area or spread across several sections. A narrow band near the bottom of a wall provides different information than a patch beside a window or beneath a roof-to-wall junction.
Then look more closely at the block face and mortar joints. Note the deposit's boundaries and whether nearby surfaces show staining or dampness. These observations give a contractor a starting point without turning the pattern into a diagnosis.
Don't rely on color alone
White residue can have more than one explanation. Construction materials, surface debris, and other substances can leave light-colored marks, so a photograph or visual description may not settle the question.
If you're unsure what you're seeing, point it out during a construction walk-through. Describe its location and appearance rather than assuming every pale mark is the same material.
Why the Construction Stage Matters
A new home passes through several stages before the exterior is complete. Exposed block, unfinished openings, site work, and final finishes each give homeowners a different view of the wall.
Exposed block offers a useful view
Before a wall receives stucco or another finish, you can see the block faces, mortar joints, and transitions more easily. This is a useful time to note any deposits and discuss them with the builder.
Location matters more than a general description such as "white spots outside." Identify the side of the house and the nearest window, door, corner, or change in grade. A wide photo followed by a closer photo can preserve that context.
Later site work changes the surroundings
Landscaping, paving, and irrigation installation can change conditions around a finished wall. Soil or mulch may sit higher than it did during an earlier walk-through, while a new patio or pool deck changes the amount of paved surface nearby.
Include those features when discussing the wall. The finished site plan and the visible wall should be considered together, especially near the foundation.
Rain and Irrigation Deserve a Closer Look
Fort Myers homes experience wind-driven rain and humid conditions. Rain can wet exposed masonry, while irrigation heads can send spray onto a wall if their direction or coverage reaches the house.
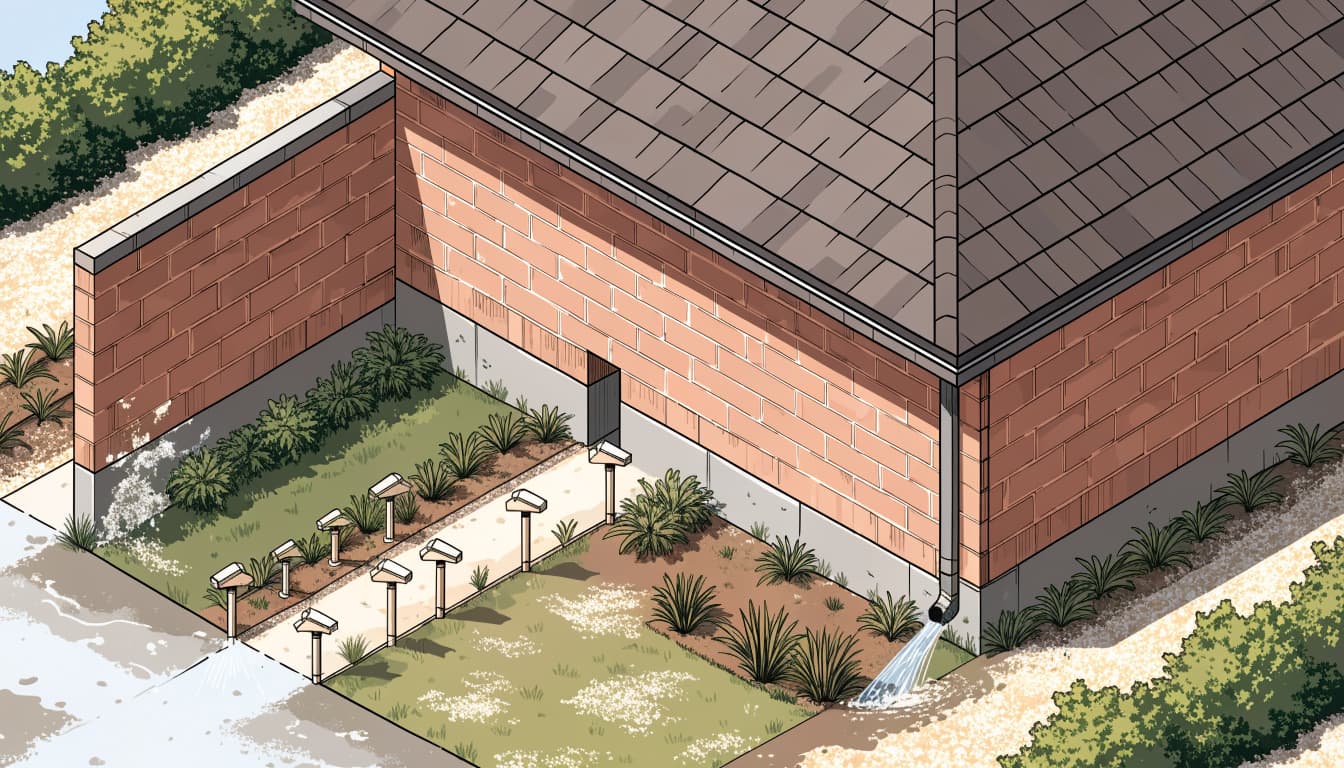
Those observations don't establish the source of a particular deposit. They do help describe the conditions a contractor needs to assess.
Observe water around the exterior
Look at the relationship between the affected area and roof edges, downspouts, nearby paving, and irrigation equipment. Note whether a downspout discharges close to the wall or whether a sprinkler reaches the block.
A wall may have several nearby water sources, so avoid assuming the closest one explains the mark. Share what you can observe, including the location of the outlet or sprinkler relative to the deposit.
Include roof and opening details
The area above a visible mark also deserves attention. Roof-to-wall intersections and window openings contain transitions that must direct water outward.
Window flashing, for example, works as part of a layered drainage detail. A clean-looking surface around the window doesn't reveal every condition behind the finish. If staining or dampness accompanies the deposit near an opening, include that detail in your report to the contractor.
Consider Grading and Drainage Near the Wall
The ground around a home is part of the moisture discussion. Finished grading, paved areas, swales, and drainage outlets influence where surface water goes after rain.
Look beyond the patch
Walk the area around the affected wall and observe the ground surface. Low spots, changes in slope, and the edge of a patio or pool deck provide context for how the lot handles water.
Fort Myers properties can include sandy soil, imported fill, or both. Final elevations and drainage features matter because the appearance of the soil alone doesn't tell you how the entire site handles runoff.
If you see standing water, note where it collects in relation to the wall. Avoid drawing a conclusion about the deposit from that observation alone.
Account for the finished landscape
Plants, mulch, and paving can change the space between the ground and the exterior finish. A drainage route that was visible before landscaping may be harder to see afterward.
During a new-home walk-through, include the bottom of the wall and the adjacent finished surfaces. If a pool or outdoor living area is part of the project, include its deck and drainage features in the discussion. The goal is a clear picture of the completed site, not only the block wall in isolation.
Stucco Drainage Details Differ From Exposed Block
A bare concrete block wall and a finished stucco assembly don't present the same visible details. Once stucco is installed, the wall base and transitions need to be considered as part of the finish system.
Keep drainage outlets visible
Where a stucco assembly has a weep screed, its outlet should remain visible and unobstructed. Mortar, paint, sealant, soil, or paving across the outlet can interfere with the intended drainage path.
Our guide to stucco weep screed clearance at grade explains how the wall base relates to earth and paved surfaces. Landscaping can reduce clearance that looked adequate before the final site work.
Review transitions as a system
The wall base is only one part of the exterior. Openings, corners, roof-to-wall connections, and changes between finishes also need details that direct water outward.
If the stucco outlet is buried or blocked, or if the wall base shows staining or persistent dampness, ask a qualified contractor to assess the assembly. Those signs warrant a closer look, but they don't identify the cause on their own.
Record What You See Before a Walk-Through
A useful record gives your builder or contractor more than a close-up of a white patch. It shows where the mark sits on the house and what surrounds it.
Take one photograph that includes a recognizable feature, such as a window, corner, or section of paving. Then take a closer image of the deposit and any nearby staining or dampness. Keep the date with the photos so the sequence is clear.
Write down observations in plain language. For example, identify whether the deposit is on exposed block, along a mortar joint, or near the base of a finished wall. Note nearby irrigation heads, downspouts, changes in grade, and wall openings without assigning them as the cause.
If the area changes, add another dated photograph. A contractor can use that record alongside an assessment of the home and site. Avoid covering the mark with stored materials or landscaping before it has been discussed, since its location may be useful to the assessment.
When to Bring in a Contractor
A white deposit by itself doesn't establish a larger water-intrusion problem. Persistent deposits deserve closer attention when they appear alongside dampness, staining, cracking, or deterioration, particularly around an opening or the bottom of a wall.
Describe the complete pattern
Tell the contractor where you've seen the residue and whether it appears with other visible changes. Point out nearby roof-to-wall connections, windows, irrigation equipment, and drainage features. If you have photographs, share the wider views as well as the close-ups.
During construction, raise the concern with your builder while the relevant wall and site details are accessible. That gives the team an opportunity to consider the deposit alongside the rest of the work.
Ask for an assessment of the assembly
A useful assessment considers the wall, its finish, adjacent openings, and the surrounding site. The contractor may need to look beyond the visible patch to understand the conditions at that location.
At Cutting Edge Homes & Renovations, we work on new homes and remodeling projects throughout Southwest Florida. If you're concerned about a wall in your project, we can discuss the visible conditions and the appropriate next step.
Keep the Focus on Moisture Conditions
Efflorescence on block walls can leave a noticeable white residue, but its appearance alone doesn't explain the conditions behind it. The wall's location and the surrounding site provide context.
Look at the deposit alongside the home's drainage details and any visible dampness or staining. A clear description helps your contractor assess the concern without guessing from the color of the residue.