Gunite Pool Shell Honeycombing: Cape Coral Checklist
Explore Our Services
Contact Us Today!
(239) 322-9295
Gunite pool shell honeycombing needs assessment before plaster because a finish can't correct weak or poorly consolidated concrete. The pre-plaster review should identify visible cavities, establish their depth and extent, and document repairs before the surface disappears.
For Cape Coral homeowners, this is a chance to catch problems while the shell remains exposed. We recommend treating shell readiness as a separate milestone from the plaster date, starting with a methodical walkthrough.
Key Takeaways Before Plaster
- Rough gunite doesn't automatically mean defective concrete, but cavities and loose material need assessment.
- Pay close attention to steps, wall-floor transitions, fittings, light niches, and areas around reinforcing steel.
- Deeper voids, exposed reinforcement, cracks, and widespread weakness need professional evaluation before finishing.
- Repairs must reach sound concrete and meet the selected finish system's preparation requirements.
1. Recognize Gunite Pool Shell Honeycombing
Separate normal roughness from suspect voids
An unfinished gunite shell usually has a rough texture. Small surface pores and uneven coloration alone don't establish that the shell has a structural problem.
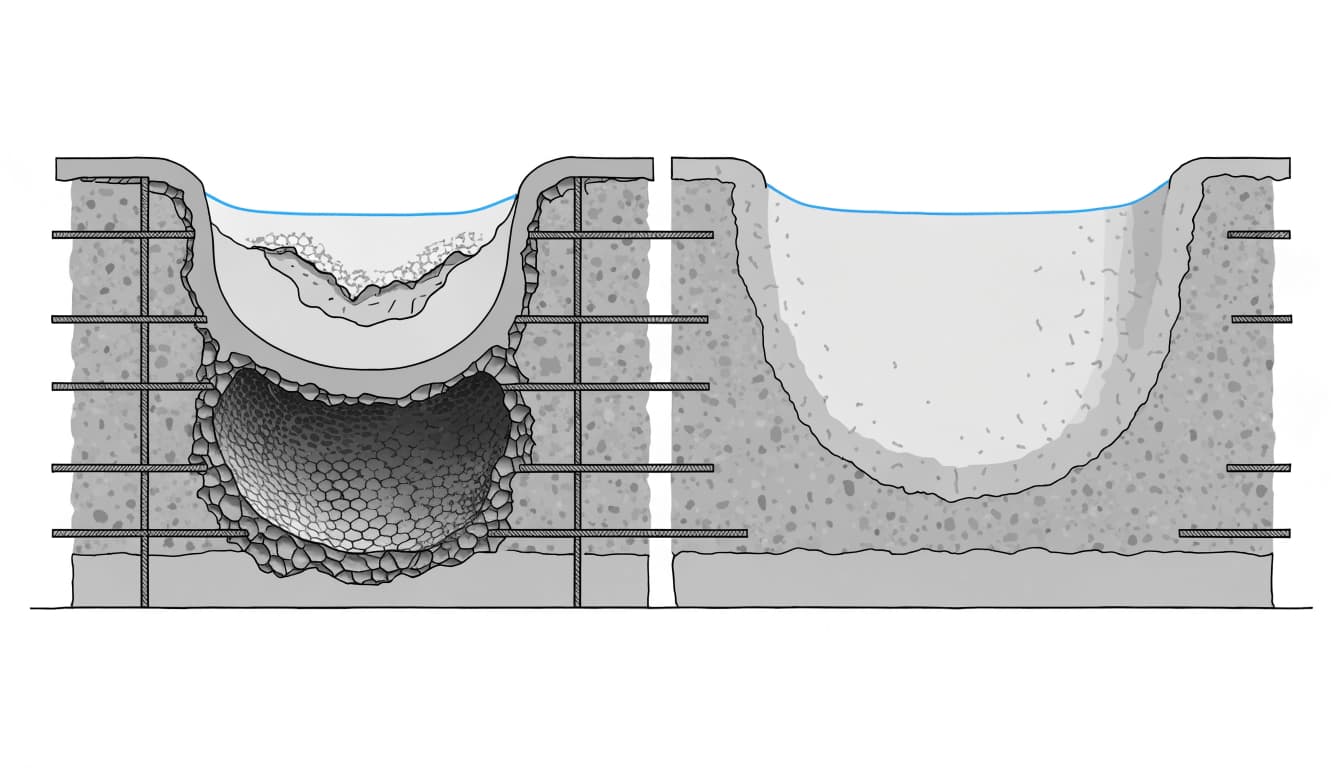
Honeycombing involves voids or poorly consolidated material within the concrete. Suspect areas may show open cavities, exposed aggregate, loose sandy pockets, or gaps around embedded components.
However, appearance doesn't establish the full condition beneath the surface. A small opening can conceal a larger pocket, while a rough-looking area may remain sound underneath.
Photograph suspect areas before cleaning or repair changes their appearance. Include both a close-up and a wider view showing the location.
Understand what may cause the condition
Placement problems can leave material poorly consolidated around reinforcing steel, plumbing, and tight contours. Obstructed spray paths can also leave pockets behind embedded components.
Rebound, material that bounces away during application, shouldn't become trapped within the shell. Loose or poorly bonded material deserves attention regardless of the suspected cause.
The assessment needs to establish both the repair boundaries and whether the condition affects the shell's intended performance.
2. Walk the Shell in a Consistent Pattern
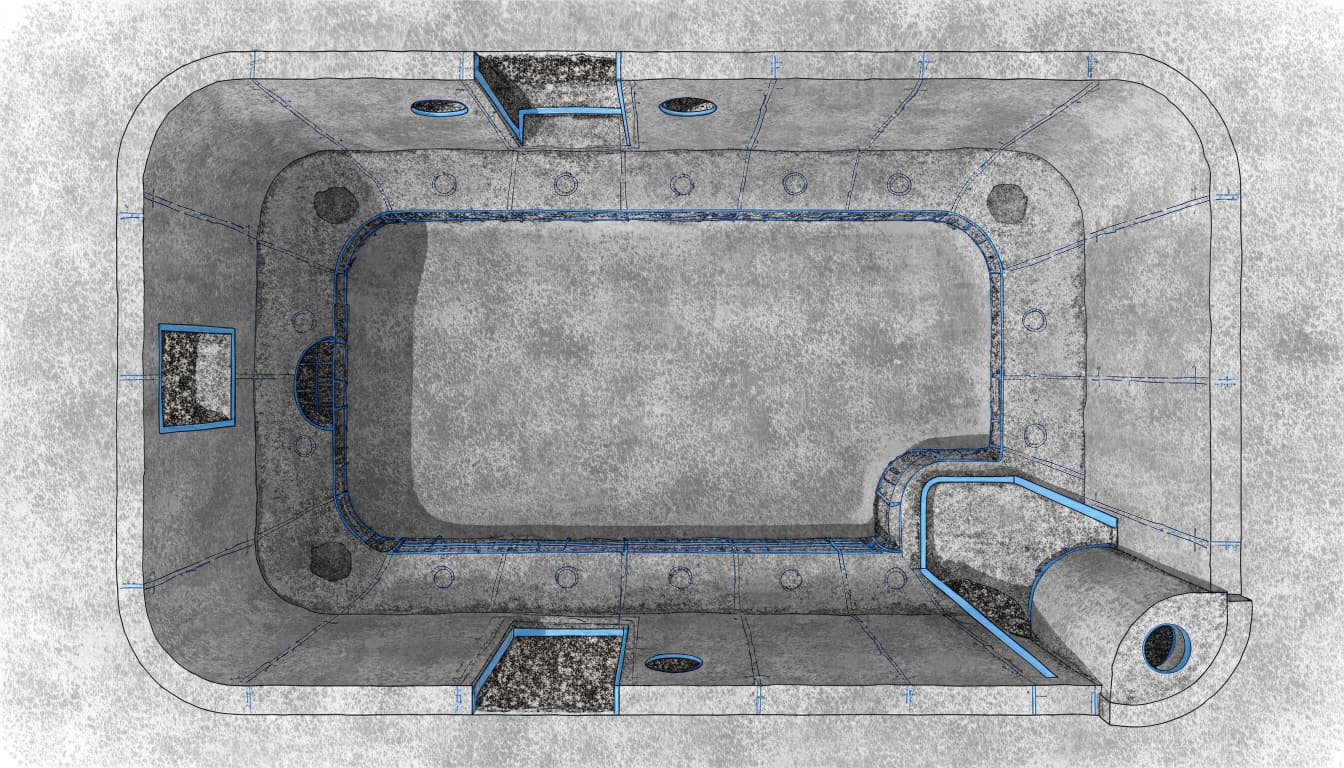
Begin at one recognizable location, such as the skimmer, then follow the perimeter before reviewing the floor. Inspect only from accessible areas approved by the builder; unfinished shells present fall hazards.
Review transitions and shaped features
Inspect the wall-floor cove, deep-end transitions, step risers, bench undersides, tanning ledges, and raised spa walls. Changing contours can make placement more demanding.
Look along edges and corners as well as broad surfaces. Record cavities, loose material, exposed steel, cracks, and damaged edges separately.
Also compare these features with the approved layout. A sound-looking surface doesn't establish that a step, bench, or spa wall matches the intended shape.
Examine every penetration
Review the concrete around returns, suction fittings, drains, skimmers, light niches, and conduits. Gaps around embedded components deserve attention before finish material covers their edges.
Keep separate observations separate. A cavity beside a return fitting and a misplaced fitting may require different corrections.
Our guidance on pool plumbing layout before shotcrete explains how embedded components coordinate with the shell. At the pre-plaster stage, that layout remains useful for identifying each fitting and comparing its position with the plans.
3. Establish the Depth and Extent of Each Defect
A useful inspection record shows more than a photograph of the worst spot. It identifies the visible boundaries and explains how the contractor assessed material beneath them.
Map the visible damage first
Give each suspect area a location reference, such as "second step riser" or "wall below skimmer." Record its visible length and width alongside dated photographs.
Record depth only where the cavity is already exposed and safely measurable. Don't push tools into concrete or chip away material yourself.
Note whether several pockets connect or recur along the same feature. Repeated defects around a wall, penetration, or transition can change the scope of the investigation.
Let qualified professionals investigate beneath the surface
A qualified contractor may use sounding and controlled removal to locate weak or poorly bonded concrete. Sounding can help identify suspect areas, but it doesn't measure strength or reveal every hidden void.
Where depth, reinforcement, or structural capacity remains uncertain, an engineer may direct further evaluation or testing.
The assessment should distinguish visible opening size from the full repair area. Material removal may expose damage extending beyond the original opening.
A patch that covers the visible hole can leave weak concrete around or behind it. Repair boundaries need to follow sound material.
4. Pause Plaster for Conditions That Need More Review
Exposed reinforcing steel, loose concrete, connected cavities, and defects extending around penetrations warrant professional assessment before finishing. So do cracks that widen, cross a wall, or appear beside soft areas.
A photograph alone can't establish whether these conditions are superficial or structural. The contractor's findings, and engineering review when needed, should determine the next step.
Storm exposure also belongs in the inspection record. Heavy rain can wash fines from fresh gunite or damage uncured areas, so affected surfaces need review afterward.
For a Cape Coral project, document the actual shell condition rather than assuming a passed calendar date means readiness. Our guidance on pool shell curing before plaster explains why curing, repairs, and finish preparation are separate considerations.
An earlier inspection also doesn't establish that the exposed shell remains unchanged after later damage.
5. Repair the Concrete Before Preparing the Finish
Remove unsound material and rebuild the affected area
A repair starts with the diagnosed condition. The crew removes loose or defective material until the remaining substrate and repair boundaries are sound.
Simply rubbing mortar over a cavity can conceal the opening without resolving the underlying weakness. Repairs involving reinforcement, substantial depth, or structural uncertainty need an appropriate repair detail.
Exposed steel also requires evaluation of its condition and surrounding concrete. Covering it with plaster doesn't restore the designed concrete protection.
The repair material must suit the location, required repair depth, and subsequent finish system. Its placement and curing requirements also affect when finishing can proceed.
Evaluate the completed repair
After curing, review the patch edges, surface condition, and surrounding concrete. A neat appearance alone doesn't prove adequate bonding or complete removal of weak material.
Keep photographs of the prepared cavity and completed repair. The written record should identify the repair material, work performed, and any engineer-directed requirements.
Then address the finish substrate as a separate task. Weak material beneath a coating can contribute to later finish problems, including some conditions discussed in our guide to causes of gunite pool plaster blisters.
6. Complete the Pre-Plaster Release Checklist
Before the finish crew arrives, the project file should connect the inspection findings with completed corrections. An unresolved defect shouldn't disappear into a general note saying the pool is ready.
Use these final checkpoints:
- Every mapped cavity, crack, exposed-steel area, and loose section has a documented disposition, with repairs completed where required.
- Repair curing and shell preparation meet the requirements of the materials being applied.
- Fittings, niches, steps, benches, and finish transitions match the approved layout, including allowances for the finished surface.
- Applicable inspection approvals, plumbing test records, and trade responsibilities are documented for the work completed.
The substrate must also be clean and properly prepared for the selected coating. Dust, loose particles, contamination, and incompatible surface materials can interfere with bonding.
Plaster, quartz, and pebble finishes each belong within a complete installation system. Our guide to pool plaster and finish options covers those choices, but finish selection should follow resolution of shell defects.
For electrical components, the licensed electrician handles evaluation and work within that trade's scope.
Frequently Asked Questions
Can plaster fill honeycombing in a gunite shell?
Plaster shouldn't replace a concrete repair. It provides the finished interior surface, while defective shell material needs its own assessment and correction. Covering a cavity can hide its opening without addressing its depth, weak edges, or material behind it.
Does honeycombing mean the entire shell needs replacement?
The visible condition alone doesn't establish the repair scope. Assessment must determine the depth, distribution, surrounding concrete condition, and relationship to reinforcement and penetrations. Localized repair may be appropriate, while more extensive concerns can require engineering review.
Can homeowners inspect the shell themselves?
You can document visible conditions from safe, approved access areas and compare exposed features with the plans. Leave sounding, chipping, testing, structural decisions, and repairs to qualified professionals. A homeowner walkthrough adds useful observations but doesn't replace their evaluation.
A Sound Shell Comes Before a Finished Surface
The strongest pre-plaster checklist connects each visible concern with a documented assessment and completed correction. Sound concrete and compatible preparation give the interior finish a dependable base.
For your Cape Coral pool, keep the shell review separate from the pressure to meet a finish date. Once plaster covers the concrete, defects become harder to investigate and more disruptive to repair.